Testing Guidelines for Emmie
Contents
Introduction
This document provides guidelines for writing tests in the frontend/tests directory. It outlines the principles and patterns to be used for consistent and reliable tests.
The goal of testing is to make sure a module (file) does what it should do, taking into account various scenarios and edge cases.
Testing Framework
- Vitest: Use Vitest as the testing framework. It provides a robust and fast environment for testing Vue.js applications.
- Vue Test Utils: Utilize Vue Test Utils for testing Vue components. It offers utilities for mounting and interacting with Vue components in tests.
Running test projects
Tests are organized in projects, see frontend/vite/test-projects.config.ts.
- Run tests for a specific project: Use the
--projectflag to run tests for a specific project:
npx vitest --project sharedOr use scripts as defined in package.json:
npm run test:user:domains:settingsRun test for specific file: Use
npm test filename.spec.tsornpm test test/.../filename.spec.ts(when there are test files with the same name in a different domain)Run tests for all projects: Simply run
vitestwithout any flags to execute tests for all projects.
npx vitestTest Structure
- Describe Blocks: Group related tests using
describeblocks. Usedescribe.sequentialto ensure tests run in sequence when necessary. In the test file, useAAA-startto easily set up a describe block with the required pattern. - It Blocks: Define individual test cases within
itblocks. Each test should focus on a single aspect of the functionality being tested. UseAAA-itto set up an it-block.
Arrange Act Assert pattern
The AAA (Arrange-Act-Assert) pattern is a common structure for writing test cases. It helps organize tests in a clear and consistent manner, making them easier to read and maintain.
- Arrange: Set up the test environment, including any necessary data, mocks, or configurations. This step prepares everything needed for the test.
- Act: Execute the function or component being tested. This is where the action takes place.
- Assert: Verify that the outcomes are as expected. This step checks that the code behaves correctly.
describe('Component Name', () => {
    it('should show name in header', async ({expect}) => {
        // Arrange
        const wrapper = shallowMount(Module, {
            props: {
                name: 'Bilal',
            },
        });

        // Act
        const header = wrapper.getByDataTest('header');

        // Assert
        expect(header).toBe('Bilal');
    });
});
Isolated testing
Ensure each test is independent and does not rely on the state of other tests. Mocking isolates the unit of work being tested and prevents dependencies on external components or services. However, mocks are always global for the whole test. Therefore it is important to contain mock implementations as much as possible by using 'Once' when setting implementations and return values: preferably use .mockImplementationOnce() over .mockImplementation() wherever possible. If necessary, use vi.clearMocks() and vi.resetMocks at the start of a single test. Refrain from using beforeEach() or afterEach(), so that any 'leaky state' between tests is not concealed.
Mocking
As a rule of thumb, everything* imported in the original file needs to be mocked for testing. If these imports are not mocked, they will be tested indirectly through the test at hand, which slows the test and makes it brittle. We do not want to test the functionality of the imported functions/components, since that should be tested in their respective tests.
* there are exceptions to this rule, e.g. functions from standard Vue modules.
Where to mock
Tests are organized in projects (frontend/vite/test-projects.config.ts). Every testing project has as setup.ts file, located in its main folder under /tests. So for the test project user/components, the setup.ts file is in tests/user/components.
As a rule, all mocks should be in this setup.ts. However:
Setup.ts may never contain mocks for files that belong to the same testing project. Mocking these in setup.ts would result in testing mocks instead of the actual code. Mocks that belong to the same test project should be placed in the test file itself.
Mocks with a specific implementation that should only apply for a specific test-file should be placed in the test-file itself.
Some mocks that are used often are not written in setup.ts directly, but are imported into setup.ts using mock lists as
import 'mocks/lists/helpers'
note: leave out the .ts extension on file names after vi.mock() in the setup and test file.
note: the module you are testing needs to be imported but should never be mocked: in Example.spec.ts, import {Example} from '…/Example'.
How to mock
A mock can be declared inline, or imported:
vi.mock('user/components/mention/MentionInput.vue', () => ({default: {props: ['modelValue', 'mentions']}}));→ Inline declared mock.vi.mock('user/components/mention/mentionHelper');→ Only the path, looks for a mock in a__mocks__ folder.These are usually for functions that are from .ts-files. Often, these have a manual mock implementation.
Manual mocks are defined by writing a module in a __mocks__ subdirectory immediately adjacent to the module. For example, to mock a module (file) called 'session.ts' in the auth directory, create a file called session.ts and put it in the auth/__mocks__ directory.
Example of a manual mock for the auth/session module:
import {vi} from 'vitest';
import {computed} from 'vue';

export const INACTIVITY_LOGOUT_KEY = 'INACTIVITY_LOGOUT_KEY';

// Here we mock the reset session function by using the mock function from vitest.
// If we want to test against a specific return value for the reset session function, we can use vi.mocked(resetSession).mockResolvedValue(value);
export const resetSession = vi.fn();

// Here we mock the computed property by creating a computed property that always returns 0.
// This way we have a standard value to test against.
// And if we want to test the computed property, we can change the value of the computed property in the test itself.
// To do this we can use vi.spyOn(secondsRemaining, 'value', 'get').mockReturnValue(0);
export const secondsRemaining = computed(() => 0);
Check your mocks
One way to check if the mocking has been done correctly and exhaustively, is to run Vitest with a Coverage report. Enable the Vitest Extension in VScode to access the Testing Tab. Running the test for component MentorTypeForm.vue for example, would result in this coverage report:
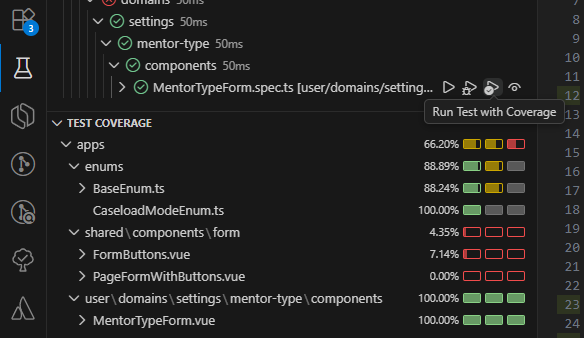
Explanation:
- MentorTypeForm is the file being tested, so it should appear in this list.
- Constants and enums are the only external factors that are allowed to appear in this list too. It is no use to mock constants and enums since a mock would get the same implementation as the real code.
- PageFormWithButtons is a component that is imported in MentorTypeForm and should therefore be mocked for this test. Once it is mocked correctly, it should not appear in this list anymore.
- Comparing the import list in the original module MentorTypeForm, you will see that FormButtons is not imported in MentorTypeForm. Instead, FormButtons is used in PageFormButtons. We therefore do not need to mock FormButtons. Once PageFormButtons has been mocked correctly, FormButtons should not appear in this list anymore either.
In this section we used coverage reports in order to check our mocks. For more information on coverage, see Coverage.
Best Practices & tips
Component Mounting
Preferably use shallowMount over mount when testing components. shallowMount creates a component instance without rendering its child components, which helps isolate the component under test and improves test performance by reducing the complexity of the rendered output. Child components in a shallow mount can be found/accessed as 'component-name-stub' in the test.
Assertions
Use expect to make assertions about the behavior of the code. Check that functions are called with the correct parameters and that promises resolve to expected values. Use it('should be used as argument and not imported at the top of the file', ({expect}) => { ... }). Make sure your it-statement expects as many situations and outcomes as possible that are relevant to the function you are testing.
Asynchronous Testing
- Async/Await: Use asynchronous functions and
awaitto handle asynchronous operations. Ensure promises are resolved before making assertions. - Flush Promises: Use
flushPromisesto wait for all pending promises to resolve, ensuring the test environment is stable before assertions.
Compare with constants instead of calculations
By performing calculations in the test and comparing the result of a function with the result of the calculations, you run the risk of repeating the same error from the function.
// Bad
it('should reverse the string', ({expect}) => {
    const result = stringReverser('testString');

    expect(result).toBe('testString'.split('').reverse().join(''));
});

// Good
it('should reverse the string', ({expect}) => {
    const result = stringReverser('testString');

    expect(result).toBe('gnirtStset');
});
Only test what happens inside a module
Make sure not to test functions that are performed outside of the file. Instead, test if they are called correctly.
// Good.
it('should sort the users', ({expect}) => {
  sortBy.mockClear(); // important!
  const wrapper = shallowMount(Component, {
    props: {users: [{name: 'Mary'}, {name: 'John'}]}
  };

  expect(sortBy).toHaveBeenCalledExactlyOnceWith([{name: 'Mary'}, {name: 'John'}]);
});
Use realistic data
Try to use realistic data as much as possible. For example, instead of using a person with the name 'a' as a test object, use a real name.
Testing non-existence
Test the non-existence of elements preferably by using .toThrowError().
Specifying Elements
To select an (HTML) element from the file being tested, a "data-test" tag can be added to the element. Example:
<div data-test="example"></div>const test = wrapper.getByDataTest('example');Checking Coverage
A good test tests behaviour: it tests whether a module does what it should do, taking into account various scenarios and edge cases. Even though 100% coverage is required, it is not the main goal of testing. It only helps to analyze which parts of the code are (not yet) being touched by the test.
The Coverage Gutters extension in VScode highlights which lines are covered and which are not covered yet after running a test with coverage report. You can also use the terminal for this and run your tests there.
Workflow
When writing tests, you can save yourself time and trouble by starting off on the right foot.
Create your test file with the right structure. Type
AAA-startand hit tab. Import the module you are going to test.Set up your mocks. Check out the import list of the module you are testing and make sure they are all mocked correctly (see Mocking)
Check your mocks. Run your test file with the Vitest extension to confirm that everything has been mocked.
List expected behaviour. What is the file supposed to do? Write your
it(should...)s and categorize them in describe blocks. Questions you may ask yourself: what happens on load? What conditions could arise, leading to which kind of behaviour? What should be the result of certain actions?Write the tests. Write the actual content of your it-statements. After writing test, run the it-test separately to set off the outcome with the code you intended to cover. You may find out the original code needs refactoring.
Test the test. Test if your file is covered completely. If not, decide if you need more it-statements or need to adjust the existing tests. Again, you may find out that the original code needs refactoring, for example if it is impossible to reach certain lines in the original code.